I graduated! And I took the bar! And now I get to have a life again! Hooray!
Tandy Leather is where I got my leather supplies. There’s one about a five minute drive from home. And they have free classes on Saturdays! So I gathered plucked up my courage, gathered my tools, and went to learn some stuff. (The added bonus, I found out when I arrived, is that the shop is wicked air conditioned. It was about 90° and getting hotter when I left the apartment, so sitting in a nice cool shop for two hours was wonderful).
While I haven’t posted about it, I have dabbled with leathercrafting a bit since my last post. I’m a champion tracer, and I can cut a decent line into the leather (I thought), but what was really giving me fits was a technique called “walking” a tool. You walk a tool by hitting it and moving it at the same time. This is particularly important for beveling. When you bevel along a cut in the leather, you basically smoosh one side of the line down, and it makes the other side seem taller by contrast. It gives the leather a 3D affect that makes patterns pop. So that was my goal today – learn how to bevel properly.
Travis, the manager of the store, was the guy giving out pointers. He set me to work on one of the basic patterns included in the kit I got for Christmas – a western style flower. When I finally got up to beveling, I was making a dog’s lunch of it. Travis corrected me on the way I was holding the tool – with the toe in the cut, but with the “face” facing me – and which direction was easiest to work from – left to right as opposed to pulling toward me, which I had been doing. It was like clouds parting. I feel really good about my improvement in the class. Some of the work I did today:
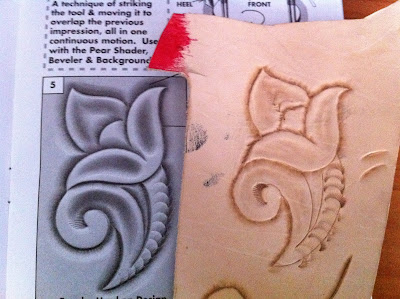
My crap flower, next to what it is supposed to look like at this stage.
An excellent example of the beveling technique I started out with this morning. The edges are really rough. I didn’t cut into the leather deep enough.
Travis said I’m pretty good with the shading tool, which is what you see on the petals. That is also a walking technique, but because the face of that tool is round against the leather, as opposed to an edge dragging down a line, I find it much easier to walk.
Travis was kind enough to ignore my efforts with the camouflage tool – the arched indents along the right side of the stem.

Some simple lines and a swirl I cut for practice beveling.
This time I cut the lines deeper into the leather, to give me a better edge to work from. I was also finally holding the tool the right way.
You can see a much smoother shaded line along the cut. That’s what it is supposed to look like! Yay!

A nice, sharp edge
By the time I did the swirl, I was finally starting to get the hang of it.
See the way the side of the swirl stands up from the leather? That’s what a well-beveled edge is supposed to look like. Yay!
Travis then said if I wanted to practice cutting and beveling at the same time, my next project should be some Celtic knot work. I purchased two “craft aids.” They are plastic sheets with a raised pattern on one side. When you get the leather wet, and press the pattern into the leather, the image is indented. This saves you the pain of having to trace it into the leather by hand. I’m only trying a little piece first.

What the finished pattern is supposed to look like

The craft aid

My piece, after cutting the pattern. Yay deep lines!
I’ll post again after I bevel and beat on that little knot work pattern.
Oh, and I haven’t done anything else with Mickey yet. When I update him, I’ll update you.
